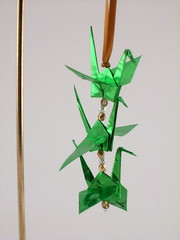
Yes, I've finally achieved that long-time Etsy goal of having 100 items listed in my shop. This is the 100th -- a set of my origami crane star ornaments in silver with green.
I still have several items to list before the month is over, though. I have at least 3 items finished and photographed, but not listed, and I have 1 finished item that isn't photographed yet. All of them are art pieces. I plan to complete a few more sets of Christmas ornaments in different colors -- those should be ready to go up into my shop next week.
Thursday, November 13, 2008
Tuesday, November 11, 2008
Experimenting with Shop Sections -- Again
It doesn't seem all that long ago that I revised my Etsy shop sections. At the time, I had two art sections: Framed and Unframed. Later, I added an ACEO section.
Recently, it occurred to me that this might not be the best way for customers to be able to find things in my shop. So I changed the Art sections to reflect the subject of the pieces. Now, there is "Animal and Nature Art," which includes my ever expanding origami zoo, and then there is the "Kanji Art," which includes all of the different kanji characters that I've done so far.
For the time being, because ACEOs are often searched for by their size, they will be staying in their own section.
Tuesday, November 4, 2008
Crane Trio, Lime Green
Three cranes strung together, mixed with beads. I used faux pearls and Czech Fire Polished Half-Metallic glass beads. I made a few of these last year, but I'm adding a few new color combinations this year. I admit I wasn't too sure about using the lime green color, but I've seen a lot of people saying that they're decorating their entire Christmas tree in this shade, so I thought I'd try it out.
Building a New Light Box
A few weeks ago, my light box that I had constructed out of pieces of white foam board finally collapsed on me. The interior was badly scratched and warped. I had known it was on it's "last legs" for a while, so I saved the box from my miter saw purchase earlier this year with the intention of building a new one with instructions acquired through the internet. You can find the complete instructions here.
This is how the box looked when I started:


Then I measured, marked and cut out the openings as instructed:
I lined the interior with white poster board, and used another sheet of poster board to create a curved backdrop:

Finally, I used thin white cotton fabric to cover the sides and top to finish the box. This is what it looks like:
It's a little smaller than I sometimes need, but it works well for the majority of my photos.
This is how the box looked when I started:


Then I measured, marked and cut out the openings as instructed:

I lined the interior with white poster board, and used another sheet of poster board to create a curved backdrop:

Finally, I used thin white cotton fabric to cover the sides and top to finish the box. This is what it looks like:

It's a little smaller than I sometimes need, but it works well for the majority of my photos.
Subscribe to:
Posts (Atom)


